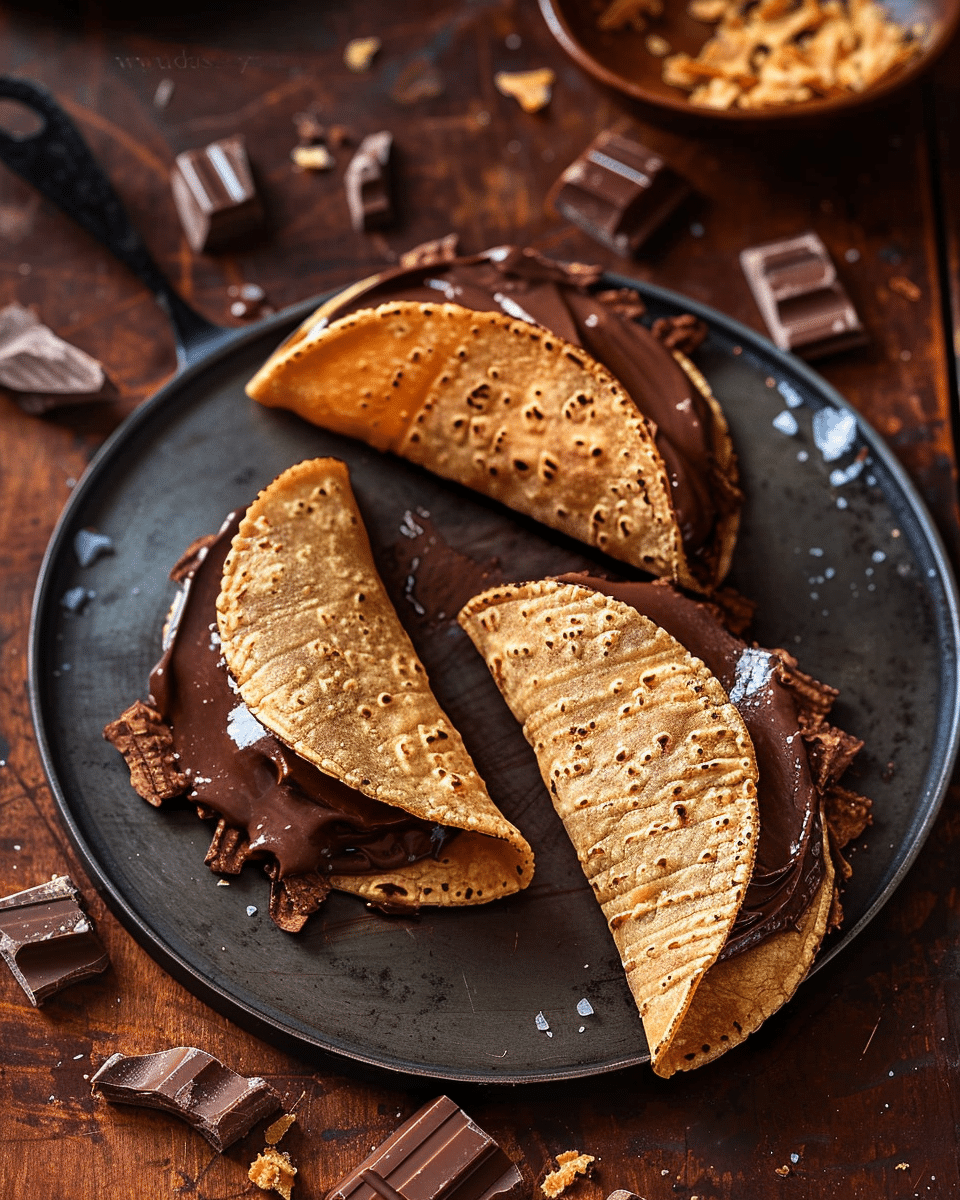
Homemade Choco Tacos are my nostalgic nod to the ultimate frozen treat. With a crisp waffle shell, creamy ice cream center, rich chocolate coating, and a sprinkle of chopped nuts, these DIY choco tacos bring back that classic ice cream truck vibe—but made right in my kitchen.
They’re surprisingly simple to make and even better than store-bought versions. I get to choose my favorite ice cream flavors, control the quality of ingredients, and customize the toppings. Whether I’m craving a fun summer dessert or just want to wow my friends with a creative twist on a classic, these choco tacos never disappoint.
Why You’ll Love This Recipe
I love this recipe because it’s just pure fun. It brings together some of my favorite dessert elements—crispy waffle cones, creamy ice cream, and chocolate shell topping—all in a hand-held, taco-shaped treat. The best part? I can totally personalize it.
Here’s why these homemade choco tacos are worth making:
- Customizable: I choose the ice cream, chocolate, and toppings I love.
- Fun to make and eat: Great for kids, parties, or reliving childhood.
- Better ingredients: I use real chocolate and good-quality ice cream.
- Make-ahead friendly: I prep and freeze them for later.
- Crispy, creamy, crunchy combo: Every bite hits all the textures I crave.
Ingredients
(Here’s a tip: Check out the full list of ingredients and measurements in the recipe card below.)
For the waffle taco shells:
- All-purpose flour
- Sugar
- Eggs
- Melted butter
- Milk
- Vanilla extract
- Salt
For the filling and topping:
- Vanilla ice cream (or your favorite flavor)
- Semi-sweet or dark chocolate chips
- Coconut oil (for melting chocolate)
- Chopped peanuts or almonds
- Optional: sprinkles, caramel drizzle, crushed cookies
Directions
Step 1: Make the Waffle Shells
- I mix the flour, sugar, salt, eggs, melted butter, milk, and vanilla extract in a bowl until I have a smooth batter.
- I heat up my waffle cone maker or a pizzelle press.
- I pour a small amount of batter onto the press and cook until golden (usually 1–2 minutes).
- While the waffle is still warm and pliable, I fold it gently over a wooden spoon handle or small rolling pin to form a taco shape. I let it cool completely in that shape so it holds.
Step 2: Fill with Ice Cream
- I let my ice cream soften slightly so it’s scoopable but not melted.
- Using a spoon or small scoop, I fill each taco shell with ice cream, pressing gently to shape it into a mound.
- I place the filled tacos on a tray lined with parchment and freeze them for 1–2 hours, or until solid.
Step 3: Dip in Chocolate and Decorate
- I melt the chocolate chips and coconut oil together in the microwave or over a double boiler until smooth.
- I dip the tops of each frozen choco taco in the melted chocolate, letting excess drip off.
- Before the chocolate sets, I sprinkle chopped peanuts, almonds, or any other toppings I’m using.
- I return the tacos to the freezer for 30 minutes to set completely.
Servings and Timing
This recipe makes about 6 homemade choco tacos, depending on shell size. From start to finish, it takes around 2.5 hours, including freezing time:
- 30 minutes to prepare batter and shells
- 15 minutes to assemble
- 1–2 hours to freeze
- 10 minutes to dip and decorate
- Variations
These choco tacos are super easy to customize based on my cravings or what I have in the freezer:
- Flavor swap: I use chocolate, strawberry, mint chip, or peanut butter swirl ice cream.
- Shell upgrades: I stir cocoa powder or cinnamon into the batter for a twist.
- Vegan version: I use dairy-free ice cream and vegan chocolate chips.
- Topping fun: I sprinkle crushed Oreos, toasted coconut, rainbow sprinkles, or even freeze-dried fruit bits on top.
- Double-dip: After the first chocolate layer sets, I dip again for an extra thick shell.
Storage/Reheating
I store the choco tacos in a freezer-safe container, separating each with parchment paper to prevent sticking. They keep well in the freezer for up to 2 weeks, though they rarely last that long in my house.
No reheating needed—just pull them out and let them sit for 2–3 minutes before biting in for the perfect texture.
FAQs
Can I make the waffle shells without a waffle maker?
Yes! I’ve used a skillet or griddle and shaped the cooked rounds while warm. They’re not as crisp, but still delicious.
What’s the best chocolate for dipping?
I use high-quality semi-sweet or dark chocolate with a spoonful of coconut oil for a smooth, snappy shell. Avoid chocolate chips with added stabilizers if possible.
Can I make these ahead of time?
Absolutely. I assemble and freeze them a day or two before serving. Just keep them tightly wrapped or sealed to prevent freezer burn.
What’s the best way to shape the taco shells?
While still warm and soft, I fold them gently over a thick utensil handle, rolling pin, or even the edge of a loaf pan. Once cool, they’ll keep their taco shape.
How do I stop the shells from getting soggy?
I make sure the waffle shells are fully cooled and crisp before filling. Freezing the filled tacos quickly helps preserve the crunch.
Conclusion
Making homemade choco tacos is a fun and creative way to bring back one of the best ice cream novelties ever invented. I love the crispy shell, the creamy ice cream, and that rich chocolate topping that hardens with just the right crunch. The best part? I get to make them exactly how I want, with all my favorite flavors and toppings.
Whether I’m looking for a unique dessert for a summer gathering or just want to treat myself with something nostalgic, these choco tacos always deliver. Once I tried them homemade, I never looked at the store-bought version the same way again.
Print
Homemade Choco Tacos
- Prep Time: 45 minutes
- Cook Time: 1.5–2 hours
- Total Time: 2.5 hours
- Yield: 6 choco tacos
- Category: Dessert, Frozen Treat
- Method: No-Bake
- Cuisine: American
- Diet: Vegetarian
Description
These homemade choco tacos are a fun and nostalgic frozen treat made with crispy waffle shells, creamy ice cream, rich chocolate coating, and crunchy nuts. They’re better than store-bought and totally customizable—perfect for summer desserts or parties!
Ingredients
- For the Waffle Taco Shells:
- 1 cup all-purpose flour
- 1/4 cup sugar
- 2 eggs
- 1/4 cup melted butter
- 1/4 cup milk
- 1 teaspoon vanilla extract
- Pinch of salt
- For the Filling & Toppings:
- Vanilla ice cream (or your favorite flavor)
- 1 cup semi-sweet or dark chocolate chips
- 1 tablespoon coconut oil
- Chopped peanuts or almonds
- Optional: sprinkles, caramel drizzle, crushed cookies
Instructions
1. Make the Waffle Shells:
-
Mix flour, sugar, salt, eggs, melted butter, milk, and vanilla until smooth.
-
Heat a waffle cone maker or pizzelle press.
-
Cook batter (1–2 minutes) until golden.
-
While warm, fold each waffle over a spoon handle or rolling pin to form a taco shape. Let cool completely.
2. Fill with Ice Cream:
-
Let ice cream soften slightly for easy scooping.
-
Fill each taco shell with ice cream, shaping into a mound.
-
Freeze on a parchment-lined tray for 1–2 hours until firm.
3. Dip in Chocolate and Decorate:
-
Melt chocolate chips and coconut oil together until smooth.
-
Dip tops of frozen tacos in melted chocolate.
-
Quickly sprinkle with chopped nuts or other toppings before chocolate sets.
-
Freeze again for 30–60 minutes until fully set.
Notes
- Make shells extra crispy by letting them cool completely before filling.
- For vegan version, use dairy-free ice cream and vegan chocolate.
- Customize with different ice cream flavors or fun toppings.
- Double-dip in chocolate for extra indulgence.
- Store in an airtight container with parchment between tacos to prevent sticking.


Your email address will not be published. Required fields are marked *