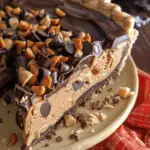
Peanut Butter Cup Pie is a dreamy dessert that combines a rich, creamy peanut butter filling with a chocolatey Oreo crust, topped off with chopped peanut butter cups for the perfect finish. It’s indulgent, no-bake, and irresistibly smooth—a pie that satisfies every peanut butter and chocolate craving.
Why You’ll Love This Recipe
I love how quick and easy this pie is to make, especially since it doesn’t require baking. The filling is silky and full of peanut butter flavor, and the Oreo crust adds the perfect chocolatey crunch. It’s also a great make-ahead dessert, which makes entertaining a breeze. Whether I’m making it for a holiday, birthday, or just because I want something sweet, this pie always hits the spot.
ingredients
(Here’s a tip: Check out the full list of ingredients and measurements in the recipe card below.)
Chocolate sandwich cookies (like Oreos), crushed
Unsalted butter, melted
Cream cheese, softened
Creamy peanut butter
Powdered sugar
Whipped topping (like Cool Whip), thawed
Mini peanut butter cups, chopped
Chocolate syrup (optional, for garnish)
directions
I start by combining the crushed chocolate sandwich cookies with melted butter and pressing the mixture firmly into a pie dish to form the crust. I pop it in the fridge to set while I prepare the filling.
In a large mixing bowl, I beat together the softened cream cheese and peanut butter until smooth and creamy.
I gradually mix in the powdered sugar, making sure it’s well incorporated.
Then I fold in the whipped topping until the mixture is light and fluffy.
I pour the filling into the prepared crust and smooth the top with a spatula.
For extra indulgence, I sprinkle chopped mini peanut butter cups over the top and drizzle with chocolate syrup.
I chill the pie in the refrigerator for at least 4 hours, or until firm, before slicing and serving.
Servings and timing
This pie serves 8 to 10 people, depending on slice size. It takes about 20 minutes to prepare, plus at least 4 hours of chilling time. No baking required.
Variations
I sometimes use a graham cracker crust for a twist on the classic chocolate base.
For a richer filling, I swap whipped topping with homemade whipped cream.
I add a layer of melted chocolate or ganache over the crust before adding the filling for an extra chocolaty bite.
If I want to make it gluten-free, I use gluten-free sandwich cookies for the crust.
For an added crunch, I like to mix in chopped roasted peanuts into the filling or sprinkle them on top.
storage/reheating
I store the pie in the refrigerator, covered, for up to 5 days. It keeps well and maintains its texture. For longer storage, I freeze individual slices in an airtight container for up to 1 month. I let them thaw in the fridge overnight before serving. Since it’s a no-bake pie, there’s no reheating required.
FAQs
How do I keep the crust from falling apart?
I make sure the cookies are finely crushed and thoroughly mixed with the melted butter. Pressing the mixture firmly into the pie dish also helps the crust hold its shape.
Can I make this pie ahead of time?
Yes, I often make it a day in advance. It actually tastes better after sitting in the fridge overnight because the flavors meld together beautifully.
What type of peanut butter works best?
I use creamy, shelf-stable peanut butter for the smoothest texture. Natural peanut butter can be too oily or separate, which might affect the consistency of the filling.
Can I use homemade whipped cream instead of Cool Whip?
Absolutely. I whip about 2 cups of heavy cream with a little powdered sugar until stiff peaks form and fold it in just like I would the whipped topping.
How do I get clean slices when serving?
I use a sharp knife dipped in warm water and wiped dry before each cut. It makes slicing through the creamy filling and crumbly crust much easier and neater.
Conclusion
Peanut Butter Cup Pie is one of those effortless desserts that delivers big on flavor and texture. I love how it’s rich, creamy, and full of chocolate and peanut butter goodness without the need to turn on the oven. Whether I’m sharing it at a gathering or indulging in a slice solo, it’s always a crowd-pleaser.
Peanut Butter Cup Pie is a luscious, no-bake dessert that blends the creamy richness of peanut butter with a crunchy Oreo cookie crust. Topped with mini peanut butter cups and drizzled with chocolate syrup, this easy-to-make pie is the ultimate treat for chocolate and peanut butter lovers. Perfect for holidays, birthdays, or any time you’re craving a decadent dessert.
Ingredients
Chocolate sandwich cookies (like Oreos), crushed
Unsalted butter, melted
Cream cheese, softened
Creamy peanut butter
Powdered sugar
Whipped topping (like Cool Whip), thawed
Mini peanut butter cups, chopped
Chocolate syrup (optional, for garnish)
Instructions
Combine crushed chocolate sandwich cookies and melted butter. Press into a pie dish to form the crust and refrigerate to set.
In a large bowl, beat together softened cream cheese and peanut butter until smooth.
Gradually add powdered sugar and mix until fully combined.
Fold in the whipped topping until light and fluffy.
Pour filling into the prepared crust and smooth the top.
Sprinkle chopped mini peanut butter cups over the top and drizzle with chocolate syrup, if using.
Chill for at least 4 hours or until firm. Slice and serve.
Notes
For a twist, try using a graham cracker crust or add melted chocolate over the crust before the filling.
Homemade whipped cream can replace whipped topping (use about 2 cups, whipped to stiff peaks).
Store in the fridge for up to 5 days or freeze individual slices for up to 1 month.
To make it gluten-free, use gluten-free sandwich cookies.
For added crunch, mix in chopped peanuts or sprinkle on top.


Your email address will not be published. Required fields are marked *